
You might have heard some interesting stories about stargazing in Texas Hill Country, and I can tell you, it exceeds all expectations! Coming from a small town, I always knew that venturing further away would enhance the views, but nothing prepared me for the breathtaking sights waiting for you out here in the Texas Hill Country.
It gets pretty dark at night in the Hill Country. When staying at Cowboys and Angels Retreat, I definitely recommend bringing a flashlight to help you navigate at night—it’s that dark! But don’t let that deter you; just look up at the night sky, and you’ll be completely spellbound. You’ll spot things you never knew you could see with the naked eye, especially compared to the view from a small town or city.
One really cool thing I discovered is how fun it is to use a star wheel to locate constellations. You can find them in stores, but ordering online is also an option. However, if those don’t work for you, a super quick solution is to get the one we have at the end of this post. Just download, print it out and you’ll be ready to go.
The night sky is a treasure trove filled with fascinating constellations, star patterns, galaxies, and lots of other wonders. Some are easily visible with just your eyes, while others might need binoculars or a telescope. You’ll notice different stars and constellations throughout the year and at various times in the night—that’s where a star wheel really becomes your best friend! Simply set it for the time of night and day of the month, point in the direction you’re facing, and it’ll show you everything visible from the horizon to straight above you.
Texas Hill Country is home to fantastic stargazing spots. Be sure to check out parks like Enchanted Rock State Natural Area and Lost Maples State Natural Area, both close by. But don’t forget, right here at Cowboys and Angels Retreat, the night sky dazzles just as brilliantly because we’re far enough away from city lights. You can enjoy a clear view of the stars without any interruptions.
9 Night Photography Tips
- Bring a Tripod – Night exposures can vary from several seconds to hours, so a lightweight tripod is a great idea! Stabilize it by hanging your camera bag from the center column.
- Use An Electronic Cable Release – An electronic shutter release minimizes vibrations. A good release often includes a timer and intervalometer, making your life easier.
- Don’t Forget Your Headlight or Penlight – It’s easy to forget, but having one will prove invaluable when you need to find buttons and dials in the dark!
- Learn Manual Camera Settings – While automatic settings can deliver decent night photos, taking manual control over focus, aperture, and shutter speed results in way better shots! Check your owner’s manual to master these settings.
- Embrace Higher ISOs – Higher ISO settings will make your camera sensors more sensitive to light, opening new doors to incredible night sky views. For traditional star trails, an ISO in the range of 100-200 is great. For vast nighttime skies, try ISOs from 1,600 to 6,400 with shutter speeds around 15 seconds or less using wide-angle lenses. You might notice some digital noise with higher ISOs, but you can figure out what’s acceptable for your tastes. Techniques like stacking images can help, but we can delve into that later!
- Shoot as Wide an Aperture as Possible – A wide aperture (like f/2.8) lets the sensor gather light quickly and keeps shutter times brief. Just remember, if you’re including foreground objects, you might need to narrow the aperture to keep everything in focus!
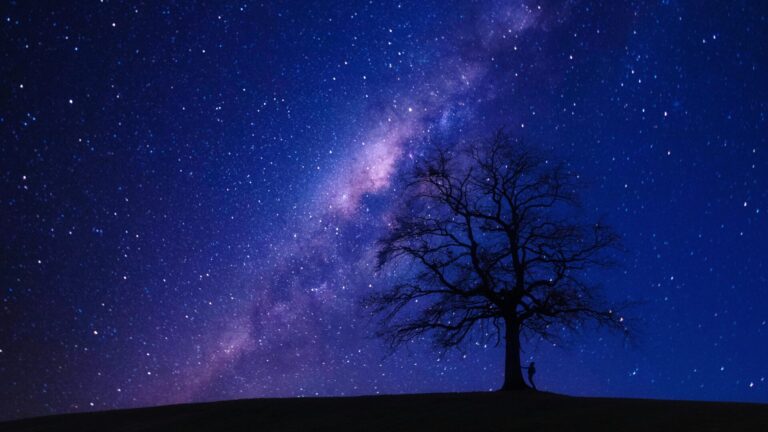
- Include Foregrounds Against Sky – While capturing the Milky Way or a moonlit landscape is truly inspiring, consider incorporating foreground elements like trees, structures, or people to add depth and interest to your images.
- Shoot Raw if Possible – Shooting in RAW format is a game-changer for night photography! The data in a RAW file far exceeds that of a typical JPG, giving you tons of choices for the final look of your image. Just keep in mind that RAW files require special software for processing.
- Experiment – There’s no one-size-fits-all exposure for night photography! It all depends on the lighting and your specific camera and lens combo. Try out various exposure times and ISO settings to find the shot that resonates best with you!

To get your free Star Wheel with instructions just click the image to the left and download to your phone or computer, print and you’ll be ready to go!
FAQs
Some of the best locations for stargazing in Hill Country Texas include the Enchanted Rock State Natural Area, the Lyndon B. Johnson National Historical Park, and the Hill Country State Natural Area. These spots offer minimal light pollution and breathtaking views of the night sky.
The best time for stargazing in Hill Country Texas is during the months of late fall to early spring, particularly on clear nights with little to no moonlight. This is when the skies are typically darker, providing optimal viewing conditions.
While stargazing in Hill Country Texas, you can spot prominent constellations such as Orion, Ursa Major, and Scorpius. During the summer months, the Milky Way is also prominently visible, adding to the beauty of the night sky.
Yes, there are stargazing events and astronomy clubs in Hill Country Texas, such as the Texas Hill Country Astronomy Club, which hosts star parties and educational events. Check local calendars for upcoming events at state parks and observatories.
For stargazing in Hill Country Texas, a good pair of binoculars or a telescope can enhance your experience. However, many constellations and celestial objects are visible to the naked eye, so simply bringing a blanket and a star chart app can be sufficient for a delightful night under the stars.